Augusta, Georgia  ·  Available Worldwide

How to Migrate from Lightroom Catalogs (Lightroom Classic & Lightroom CC) to Affinity Design Software

Rebuilding Lightroom Catalogs Including Lightroom Classic & Lightroom CC) in Affinity Design Software + Backup Photo & Tagging Service

A Photographer, Brand Manager, or Marketing Professional’s Roadmap

From Lightroom Catalogs to Affinity

Rebuilding Your Photo & Video Editing & Backup Workflow

Hero image — editing desk with monitor showing before/after photo edit, warm natural light — suggested 1600 × 900 px

A step-by-step guide for photographers leaving the Adobe Lightroom Catalog management for Affinity’s FREE all-in-one design suite — plus how to replace your Lightroom catalog, digital media search, backup workflow.

Why Photographers, Digital Media Managers, Marketing Professionals and other Creatives Are Making the Switch from Lightroom to Affinity

If you’ve built your entire editing life around Adobe Lightroom, we are right there with you. You must already know the two things Lightroom actually does for you: it edits your RAW files non-destructively, and it catalogs, tags, and organizes tens of thousands of images so you can find any photo in seconds. Lightroom also allows you quick export features for DNG, JPG (small and large) and whatever your original file type was. These are three separate jobs wearing one subscription.

Affinity — the free, all-in-one design suite from Canva (formerly three separate apps: Affinity Designer, Affinity Photo, and Affinity Publisher) — replaces the editing half of that equation with zero ongoing cost. But Affinity is not a catalog manager. It has no built-in library, no keyword database, and no automatic backup. That means a full migration away from Lightroom actually requires two decisions, not one:

This guide walks through both, key decisions, in order, with real cost estimates so you can budget the move with confidence.

A note on the name

Affinity is no longer three separate paid apps. As of late 2025, Canva (which acquired Affinity’s parent company, Serif, in 2024) merged Affinity Designer, Affinity Photo, and Affinity Publisher into one free, unified application simply called Affinity. Affinity’s design and photo editing software opens in three modes — Vector, Pixel, and Layout, referred to as “studios” — inside a single software application. Core editing is free forever; optional AI tools require a paid Canva subscription.


Part 1: Understanding What You're Actually Replacing

What Adobe's Lightroom Catalog Does Today

Your Adobe Lightroom Catalog (the .lrcat file) is a database — not your photos themselves. Lightroom stores:

Your actual image files live separately on your hard drives, and Lightroom’s cloud sync (if you use it) is really a photo backup and access service layered on top.

What Affinity Replaces — and What It Doesn't

Function

In Affinity?

Notes

Adobe’s Photoshop & Camera RAW photo editing

✓ Yes (Pixel Persona, now called Studio)

Non-destructive layers, adjustment layers

Adobe Illustrator’s Vector / graphic design

✓ Yes (Vector Persona, now called Studio)

Replaces Designer-style work

Adobe InDesign’s Page layout / print design

✓ Yes (Layout Studio)

Replaces Publisher-style work

Catalog / library management, unless you use Canva (FREE or Paid)

✓ Partially, IF you use Canva for creative asset management

No built-in keyword or metadata database

Cloud backup of originals

✓ Partially, if you use Canva for creative asset management

You must add a separate backup solution

Batch culling / star ratings

Partial

Basic file browser only, not a true DAM

Screenshot: Affinity's Pixel Persona editing workspace with RAW develop panel open — suggested 1400 × 900 px

Part 2: Migrating Your Photo & Video Editing Workflow to Affinity

Step-by-Step Setup

1

Download and install Affinity. It’s free on Windows and macOS at affinity.studio (an iPad release is expected later in 2026). Sign in with a free Canva account — no payment required for the core design software apps.

2

Export your Lightroom edit history as reference, not as a working file. Lightroom edits don’t transfer into Affinity’s format, so for photos you plan to re-edit, export a high-resolution .DNG of your current edit first. This becomes your new starting layer if you want to preserve the look.

3

For RAW files you haven’t finished editing, export the original RAW (or a DNG) out of your Lightroom folder structure and open it directly in Affinity’s Pixel Persona, which reads most camera RAW formats natively.

4

Rebuild your develop presets. Affinity uses its own macro and preset system rather than Lightroom’s Develop presets. Recreate your most-used looks as Affinity macros once, and you can batch-apply them going forward.

5

Set up a consistent export/output folder structure now, before you migrate volume — this will matter for Part 3, since your DAM or backup tool will need predictable folder logic to index against.

6

Batch process a small test set (20–30 images) fully through Affinity before committing your whole active season to it. Confirm color profiles, sharpening output, and file sizes match your expectations.

Workflow tip
Keep Lightroom installed (even on a free trial or an old license) purely as a read-only archive viewer until you’ve fully verified your new workflow. Don’t delete your .lrcat file — treat it as your index of what edits used to exist, even after you’ve moved the actual editing work to Affinity.
Before/after slider graphic showing a RAW photo edited in Affinity — suggested 1400 × 800 px

Part 3: Replacing Lightroom's Catalog & Backup

This is the part most guides skip — and it’s the part that actually costs money. You have two broad paths:

Option A: Canva as Your Digital Asset Manager (DAM)

Since Affinity lives inside the Canva ecosystem, Canva’s own asset library can double as a lightweight digital asset manager. Uploaded images get folders, tags, and search, and sync directly into your Affinity projects.

Option B: A Dedicated Cloud Backup Service

For full-resolution RAW archives, most working photographers and media managers are better served pairing Affinity with a real backup/storage service built for large libraries. Here’s how the major options compare:

Service

Typical Cost

Structure

Best For

Backblaze Personal Backup

$9/mo or $99/yr per computer

Unlimited

Simple, unlimited, not folder-selective

Backblaze B2 Cloud Storage

~$6/TB/mo

Pay-per-TB

Large, precise RAW archives; S3-compatible

Amazon Photos

Free w/ Prime (photos) or ~$6.99/mo for 100GB+

Tiered

Unlimited full-res photos w/ Prime

Google One

~$1.99–$9.99/mo (100GB–2TB)

Tiered

Easy if already in Google ecosystem

Microsoft OneDrive

~$1.99–$9.99/mo (100GB–2TB, w/ M365)

Tiered

Good if already using Microsoft 365

iDrive

~$79.50/yr for 5TB (promo pricing varies)

Tiered

Frequently discounted; multiple devices

Pricing reflects general market rates as of mid-2026 and changes often — confirm current rates on each provider’s site before budgeting.

How to Estimate Your Photo & Digital Media Catalog Size (Before You Choose a Plan)

Don’t guess your photo/video storage needs — check them. Here’s how to get a true numbre:

1

In Lightroom, open your Catalog Settings, or simply check the file size of your main photo storage folder on your hard drive (right-click → Properties on Windows, or Get Info on Mac).

2

If your library is split across multiple drives or external backups, total the size of each folder that holds original RAW files — don’t count Lightroom’s generated previews, which can be excluded.

3

Divide your total library size by your average Camera RAW file size to sanity-check your file count against Lightroom’s own photo count (visible in the Catalog panel).

4

Add 20–30% headroom for a full year of future shooting, so your backup plan doesn’t require an upgrade a few months in.

5

Match that number against the storage tiers above to find your realistic monthly or annual cost.

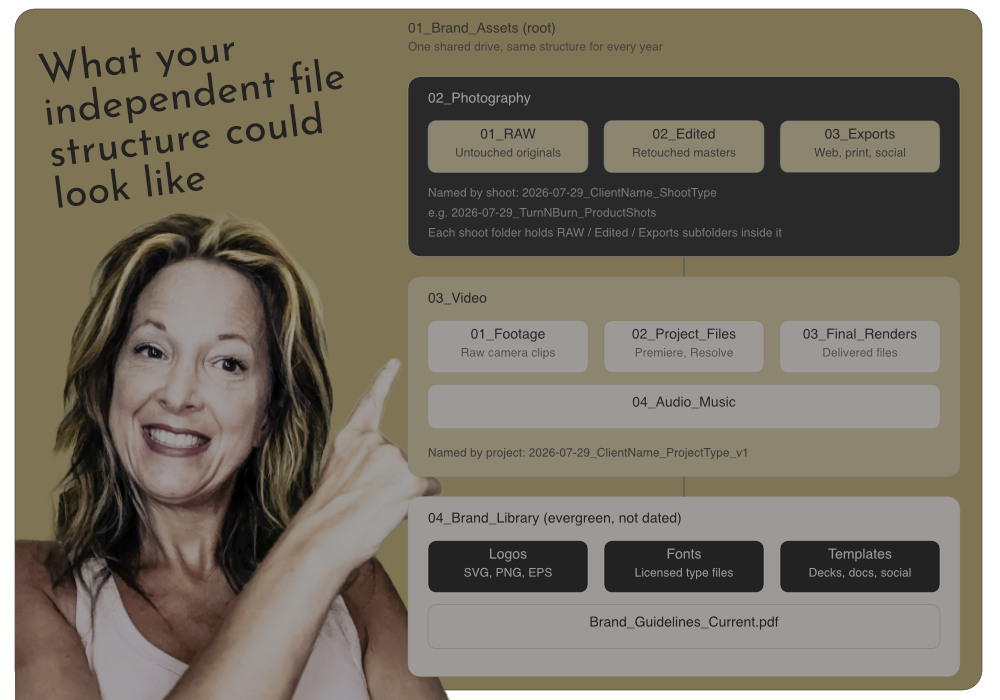
Brand Management File Structure
Digital Photos File Structure
Quick reference

A typical full-frame Camera RAW file runs 25–45MB. 10,000 images ≈ 250–450GB. 50,000 images ≈ 1.25–2.25TB. Use your own average file size for accuracy — mirrorless camera bodies with high megapixel counts can run considerably larger.

Part 4: Putting It All Together

A complete post-Lightroom workflow looks like this:

1

Shoot and import RAW files into a consistent local folder structure

2

Cull and rate using your file browser or a lightweight culling tool

3

Edit in Affinity’s Pixel Studio using rebuilt macros/presets

4

Export finals and organize them in Canva (or your DAM of choice) for client delivery and design reuse

5

Back up full-resolution RAW originals to your chosen cloud storage service, sized to your actual catalog

Final thought
Affinity solves the editing-cost problem. It does not solve the organization-and-backup problem — that’s a separate line item in your budget, and now you have the numbers to plan for it accurately.

Ashley Bailey Designs  •  ashleybaileydesigns.com